Jetson Zero Copy for Embedded applications
- Jetson Zero Copy for Embedded applications
Jetson hardware platform from NVIDIA opens new opportunities for embedded applications with Powerful ARM processor, various software libraries, high-performance internal GPU with CUDA and Tensor cores and helpful features. These are presented below.
What is Zero-Copy with NVIDIA Jetson?
Image acquisition is a fundamental step in every camera application.
Usually, the camera sends captured frames to system memory through an external interface - GigE, USB3, CameraLink, CoaXPress, 10-GigE, Thunderbolt, PCIe etc.
In the high performance solutions, GPU is used for further image processing, so these frames are copied to GPU DRAM memory.
That is the case for the conventional discrete GPU architecture.
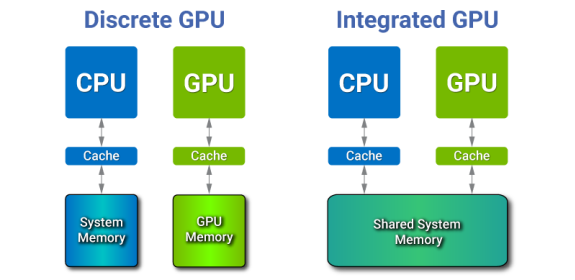
NVIDIA Jetson, on the other hand, has integrated architecture where CPU and GPU are placed on a single die and physically share the same system memory.
Such structure presents new opportunities for CPU-GPU communications, absent in discrete GPUs.

Fig.1. Discrete and Integrated GPU architectures
With integrated GPU the copy is redundant since GPU uses the same pool of physical memory as CPU.
Still, the copy cannot be ignored, because software developers expect that writing to the source buffer on CPU will not affect data processing on GPU after that copy.
That is why a separate zero-copy feature is needed where the redundant copy can be avoided.
Zero-copy basically means that no time needs to be spent to copy data from host to device over PCIe contrary to any discrete laptop/desktop/server GPU.
In general, this is the way how integrated GPU can take advantage of DMA (Direct Memory access), shared memory and caches.
In order to discuss the underlying methods for eliminating the extra data copy, the concept of the pinned memory in CUDA needs to be explained first.
What is Pinned Memory?
Pinned (page-locked) memory is assigned to the CPU and prevents OS to move or swap it out to disk.
It can be allocated by using cudaMallocHost function instead of the conventional malloc.
Pinned memory provides higher transfer speed for GPU and allows asynchronous copying.
Once pinned, that part of memory becomes unavailable to the concurrent processes, effectively reducing the memory pool available to the other programs and OS.

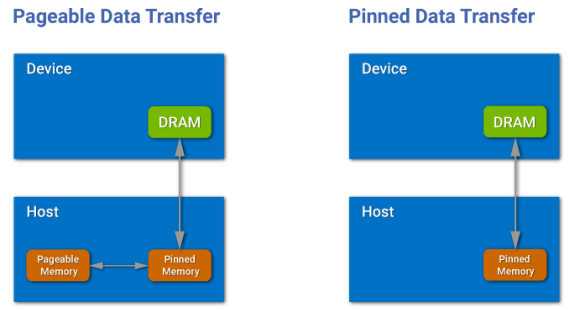
Fig.2. Copy from pageable memory and from pinned memory
CPU-GPU transfers via PCIe only occur using the DMA, which requires pinned buffers, but the host (CPU) data allocations are pageable by default.
So, when a data transfer from pageable host memory to device memory is invoked, the GPU driver must copy the host data to the pre-allocated pinned buffer and pass it to the DMA.
This helps to avoid the excessive transfer between pageable and pinned host buffers by directly allocating host arrays in pinned memory.
To summarize - in order to get zero-copy access in CUDA, the “mapped” pinned buffers have to be used, these are page-locked and also mapped into the CUDA address space.
Mapped, pinned memory (zero-copy) is useful in the following cases:
- GPU is integrated with the host
- GPU has not enough of its own DRAM memory for all the data
- The data is loaded to GPU exactly once, but a kernel has a lot of other operations, and you want to hide memory transfer latencies through them
- Communication between host and GPU, while kernel is still running
- You want to get a cleaner code by avoiding explicit data transfer between host and device
Mapped, pinned memory (zero-copy) is not useful when:
- Excessive allocation of pinned memory could degrade the performance of the host system
- Data is read (or is read/written) multiple times, since zero-copy memory is not cached on GPU and data will be passed through PCIe multiple times, so the latency of access will be much worse compared to the global memory
What is Unified Memory?
Unified Memory in CUDA is a single memory address space accessible from any processor in a system.
It is a hardware and software technology that allows allocating buffers that can be accessed from either CPU or GPU code without explicit memory copies.
While traditional (not unified) memory model has been able to give the best performance, it requires very careful management of GPU resources and predictable access patterns.
The Zero-copy model has provided fine-grained access to the system memory, but in discrete GPU systems the performance is limited by the PCIe, and this doesn’t allow to take advantage of data locality.
The Unified memory combines the advantages of explicit copies and zero-copy access: it gives to each processor access to the system memory and automatically migrates the data on-demand so that all data accesses are fast.
For Jetson, it means avoiding excessive copies as in the case of zero-copy memory.

Fig.3. Unified memory multi GPU
(picture from https://devblogs.nvidia.com/unified-memory-cuda-beginners/)
In order to use Unified Memory you just need to replace malloc() calls with cudaMallocManaged(), which returns universal pointer accessible from either CPU or GPU.
On Pascal GPUs (or newer) you’ll also get the support of hardware page faulting (which ensures migration of only those memory pages, which are actually accessed) and concurrent access from multiple processors.
On a 64-bit OS, where CUDA Unified Virtual Addressing (UVA) is in effect, there is no difference between pinned memory and zero-copy memory (i.e. pinned and mapped).
This is because the UVA feature in CUDA causes all pinned allocations to be mapped by default.
Zero-Copy in Jetson Image Processing Applications
When connecting USB3 or PCIe camera (or any other interface) to Jetson TX2 you need to take into account that any of them has a limited bandwidth.
Moreover, when using traditional memory access, a delay due to the copy of captured images from CPU to GPU memory is unavoidable.
Nevertheless, when using Zero-copy, that time is eventually hidden, thus resulting in better performance and lower latency.
This being said, Zero copy is not the only way how to hide host-to-device copy time and improve the total latency of the system.
Another possible approach is overlapping image copy and image processing in different threads or processes. It will boost the throughput, but it will not improve the latency.
Plus, such an approach is feasible only in concurrent CUDA Streams, which means the necessity to create at least two independent pipelines in two CPU threads or processes.
Unfortunately, this is not always possible, because of the limited size of GPU DRAM memory.
One more way of reducing the cost of host-to-device transfer is the so-called Direct-GPU method, where data is sent directly from a camera driver to GPU via DMA.
This kind of approach requires driver modification, so this is a task for camera manufacturers, not for system integrators or third-party software developers.
To summarize, zero-copy approach is very useful for integrated GPU, and it makes sense to use it in the image processing workflow, particularly for embedded camera applications on Jetson.
Below is a real camera application example which showcases the simplicity and efficiency of this method in the attempt to improve the performance and decrease the latency.
Low-latency Jetson TX2 processing with live H.264 RTSP streaming
Since Jetson is remarkably small and powerful, it became natural to use it for remote control in various mobile applications.
In these, the camera is connected to Jetson which performs all processing and sends the processed data over the wireless connection to a detached PC.
It is possible to achieve this in a relatively fast manner together with low latency.
This kind of solution has been implemented by MRTech company using Fastvideo SDK with XIMEA cameras attached to NVIDIA Jetson through proprietary, compact carrier board.
Hardware specification
- Image sensor resolution: 1024×768, 8-bit bayer
- Camera frame rate: 180 fps
- Monitor refresh rate: 144 fps
- Wireless network bandwidth: 10 Mbit/s
- Jetson TX2 power consumption: 21 W
Image processing pipeline on Jetson TX2 and Quadro P2000
- Image acquisition from camera and zero-copy to Jetson GPU
- Black level
- White Balance
- HQLI Debayer
- Export to YUV
- H.264 encoding via NVENC
- RTSP streaming to the main PC via wireless network
- Stream acquisition at the main PC
- Stream decoding via NVDEC on desktop GPU
- Show image on the monitor via OpenGL
Glass-to-glass video latency
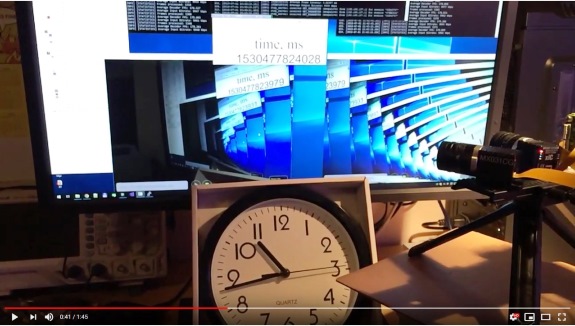
To check the latency of this solution, a so-called glass-to-glass (G2G) latency test was performed.
The goal was to get the current time with high precision and to show it on a monitor with high refresh rate.
Then, this representation needed to be captured from the monitor with an external camera, which next would send the data to Jetson for processing and streaming.
Finally, the time when the new processed frame was exposed needed to be shown on the same monitor.
The required result would be to see the values of both times on the same monitor so that their difference corresponds to the real latency of the system.
Systematic error for such a method could be evaluated as half of camera exposure time plus half of monitor refresh time. In this case it is around: (5 ms + 7 ms)/2 = 6 ms.
On the following video, you can see the setup and live view of that solution.
Originally, Jetson was connected to the main PC via cable, but later on, it was switched to a wireless connection with the main PC.
You can stop the video to check the time difference between frames and evaluate the latency.
The averaged latency was about 60 ms which can be considered an exceptional result meaning that the idea of a remote control is definitely a viable one.
NOTE: Please keep in mind that this is just a sample application to show what could be done on NVIDIA Jetson and to evaluate actual latency in glass-to-glass test. Real use cases for two and more cameras could utilize any other image processing pipeline for your particular application and such a solution could also be implemented for multi-camera systems.
Credentials
Fastvideo Blog:
https://www.fastcompression.com/blog/jetson-zero-copy.htm
